Pages

Welcome!

Hi, Salam! We love cakes and simplicity! Cakes don't have to be fancy or rustic to taste nice though there's nothing wrong with that! Wanna cake? Feel like eating cakes? A the end of the week treat for yourself? Just as an excuse to get together with family or friends? Or a lovely surprise for a special someone? Contact us.
There also some recipes featured here, but no, no, we didn't create them. Links to the original sites are provided. If there isn't any, we are very grateful for the links but sorry that it got lost or forgotten.

Thursday 18 December 2014

Carrot Cake

Easy Carrot Cake.

Maybe I should change that title to the easier carrot cake - ever!

Honestly I do not like carrot cake.
But it appeals to some. My mum has been telling me to bake one like for quite a while,
but since I'm not a fan I took my time searching the internet and recipes books for a good one.
Actually I was really looking for an easy one that doesn't require much ingredients or steps.
Me being lazy ha ha ha!

I kept 'looking' until one day, mum decided that she really wanted to eat one. So off we went to a famous cake shop, I won't mention it here as I don't want to hurt people's feelings...
Bought a piece, brought it back and well needless to say mum was not pleased! Wasted a good RM 10.00 too!

So I Googled for carrot cake recipe and got several. There were even ones with pineapple!?! Wasn't this suppose to be carrot cake? So then I tried Googling easy carrot cake recipe and magically this recipe appeared!
I have baked this twice and both times it was a big hit! Mum is happy, so I'm 'happily' grating the carrots!

One thing though, at the end of the recipe there is a link to a video on youtube.
You will notice that some of the measurements for the ingredients vary. So I opt for the youtube version.
It is up to you, which one to chose, but I posted the one on youtube.

I chose a rectangular baking tin but you could easily use an 8 in round tin too!


Carrot Cake
source: all recipes uk
watch it on youtube

Ingredients
250g all purpose flour
4 eggs
300ml oil
2 tsp vanilla
2 tsp bicarbonate soda
2 tsp baking powder
1/2 tsp salt
2 tsp ground cinnamon (I skipped this)
400 g sugar (I used brown sugar)
120g chopped walnuts (I only used 100g)
350g grated carrots

Method
In a bowl, combine eggs, oil, sugar and vanilla and beat until creamy and thick.
Add in flour, baking powder, bicarbonate soda and cinnamon (If using).
Beat again.
Add in the grated carrots and walnuts. Mix to combine.
Pour into greased tin and bake at 180 C for 40-50 min.
Leave to cool in tin for 10 minutes before taking out.

Cream Cheese Topping.
125g butter
200g cream cheese
1 tsp vanilla
450g icing sugar
120g walnuts ( I skipped this)

Method
Beat cream cheese and butter until smooth and creamy.
Add in the icing sugar and beat again.
Add in the vanilla and the walnuts.
Ice the cake when it is cooled.

** I did this icing and got a lot. Too much for the cake.
In fact I could ice two cakes with one quantity of topping.
I suggest you half the recipe for a cake.

Caramel Chocolate Cake

 Caramel Chocolate Cake


Hmm... the name of the cake alone is already making me drool.

In fact I came across several recipes of this said cake a few times but after reading the ingredients and method I just skipped to the next recipe as I thought it was a tad tedious and hassle.
This is the sure proof that you'll never know until you try.

A few weeks ago, my brother's friend gave us several pieces of this cake.
At first I was rather skeptical, the cake looks great but I wonder does it taste great too?
After all it is a steamed cake and I don't really like steamed cakes.
But after one mouthful, I was totally convinced that I have been an idiot not to try out this recipe sooner!
Make sure your steamer is filled with water at all times and ready!

Caramel Chocolate Cake

Ingredients

2 Tbsp sugar
Sprinkle onto baking tin (8 in round tin) and slowly melt over fire until it turn brownish.
Be careful not to burn the sugar!
Put aside to cool.

For Caramel
1 cup condensed milk
1 cup evaporated milk
3 yolks
1 tsp vanilla

In a bowl combine everything, and whisk to combine.
Don't over beat, as air bubbles will make your caramel filled with holes.
Pour onto cool melted sugar and steam for 15 mins.
Once cook, take out and leave to cool for a while.

For the Chocolate Cake
A
1 cup condensed milk
1 cup evaporated milk
1 cup oil (any cooking oil will do, I used sunflower oil)
1 cup sugar
1 cup cocoa powder

Combine all the ingredients in a pot and slowly cook until it turns into a smooth paste
and warm through. Stir at all times, to avoid burning.Switch off fire and cool.

Chocolate Cake
B
4 eggs (lightly beaten)
1 cup flour
1 tsp bicarbonate soda
1 tsp baking powder

Sieve flour and both baking powder and soda . Beat the eggs.
Using a whisk, alternate the flour and eggs into the chocolate mixture.
Then slowly, using a ladle, spoon the mixture on top of the caramel layer.
Do it gently to avoid breaking the caramel.

Then steam again for 45 min to 1 hour.
Check that there is water in the steamer at all times and occasionally wipe the insides of the cover to avoid too much water dripping onto the surface of the cake.

Leave the cake to cool completely, about 2 to 3 hours before attempting to remove it from the tin.
Using a butter knife gently loosen the sides and use a plate to flip the cake as some melted sugar will drip to the sides of the cake.
Cool in the fridge or eat it.

Happy Baking.


Crispy Japanese Cream Puff


I came across this recipe while looking for another recipe. In fact it didn't have anything to do with cream puffs at all!
I often wondered what those cracky bits on top were whenever I spot theses at the shops. Lo Behold, I now know! LOL

Basically, cream puffs are choux pastry.
  1. Choux pastry, or pâte à choux, is a light pastry dough used to make profiteroles, croquembouches, éclairs, French crullers, beignets, St. Honoré cake, and gougères. It contains only butter, water, flour, and eggs. Wikipedia
Choux pastry is not easy to do. I had several moments where I just wanted to throw everything in the bin or they, i.e the puffs simply refuse to puff up! Believe me, I had my fair share of ruined profiteroles which we commonly call cream puffs.

I have yet to try making eclairs, although it just a different technique in pipping the shape of the pastry
but I do want but am afraid to try out croquembouches!

Look how beautiful they are, a real treat for a very special occasion like a wedding, birthdays or even Christmas!
They are just stacked puffs, 'glued' around a cone, to retain its shape and filled with whatever your heart or tummy desire, cream, custard or chocolate. Then drizzled if wished with melted chocolate, or draped with pulled sugar or just left on its own.
But it requires a lot of patience and hard work, something I am lacking in... hihihi!
Pictures courtesy of Google, unfortunately not mine T T


Right back to reality, 'knock, knock' on my head.
The recipe for this cream puff version, a Japanese one is relatively easy to follow.
I must admit it is the first one I have come across that has baking powder as one of its ingredients!
But I tried it out, in fact several times and it worked! Hey, go figure janji it comes out fine and delicious!
I think the tricky part would only be where you cook the dough on the stove.

Make sure, the fire is medium low and that the dough must pull away from the sides of the pot and forms a ball. If this doesn't happen, *sigh* don't waste your time, energy and electricity to go to the next step.
In choux pastry the dough forming into a ball is a very important step.
Using cold eggs also helps cool the dough.
Another tip, a hot oven is also vital as it helps the puffs, to puff up!

But with a lot of practice and patient, it is possible.
Please don't let my words deter you from trying out this wonderful pastry.
Follow each step carefully and take care during the cooking process, God's will you will be fine.

If you are up to it, here is the recipe.

Crispy cream puff
source: Julia Homemade

Ingredients
100g of butter
1 tsp of sugar
110g water
1/2 tsp salt (omit if using salted butter)

120g all purpose flour
1/2 tsp baking powder
3 eggs

Topping
50g butter
50g sugar
1 Tbsp water (I added another table spoon of water for smoother flow)
50g flour

Beat all into a smooth paste.
Put it into a pipping bag and pipe spiral circles, onto the puffs.
* make sure to cover the puff evenly as it will expand as it cooks.

Method
Preheat oven to 180-200 C.
In a pot, combine water, sugar and butter. Boil gently until the butter melts.
Add in the flour all at once and stir until the flour combines with the mixture.
Keep stirring until the dough pulls away from the sides of the pot and forms into a ball.
Switch off the fire.
Put aside to cool.
When cool, add cold eggs one at a time. Use a wooden spoon to beat until combine before adding another egg. Lastly add in the baking powder. Beat again to combine.

Now either using a piping bag or a spoon, pipe or place the balls of pastry onto a greased baking tray.
Leave some space in between each puff as it will balloon up twice its size.
Pipe the topping on each puff.
Bake at 180-200c according to your oven, until puffy and golden brown.

Take it out of the oven and cool on a cooling rack. Be gentle, as a hot puff can suddenly deflate if crushed.

The Filling
Puan Julia used chocolate cream as the filling, but I prefer a custard filling.

3/4 cup of milk
2 Tbsp custard powder
2 Tbsp sugar
1/4 cup water

Mix the custard powder with the water, stirring out the lumps before adding it to the milk and sugar mixture.
In a pot, gently boil everything, stirring occasionally to avoid lumps.
Once the custard thickens, and warm through switch off fire.

Cut the puff using a scissors, half way through and pipe in or spoon in the warm custard.
Ready to eat!

Happy baking.


Tuesday 14 October 2014

Doraemon!

Birthday Cake

A friend asked if I could bake a birthday cake for her son's first birthday... cute! First birthdays are important even if the birthday person isn't quite aware of what exactly is happening or who are all those people...!!

The mum wanted it to be Doraemon as that is his favourite cartoon character.
So off I went looking high and low of the said cat's edible icing sheet, but sadly after visiting 4 shops, Doraemon was no where in sight!
Eventually we settled for figurines of the blue cat made of sugar and some plastic toys.

For this cake I baked a Victoria Sandwich, chocolate and vanilla with butter cream topping.
As she didn't want a lot of cream, I covered the sides lightly with some butter cream before propping up bars of Kitkat that look like fences. For a festive touch I added some colourful lollipops.

Applying the fences a.k.a kitkat takes a lot of patience and a bit of icing.
Patience, so that the bars don't break as you are unwrapping them.
Icing, works like glue to stick to the cake. When done, gently press the bars to the cake and put it in the fridge to set. Same goes for the cats, a bit of icing at the bottom of eat figurines, helps them stick better.
I piped some rosette at the edge between the cake and kitkat bars, to close some gaps.
If you like, tie a colourful ribbon around the chocolate bars with a big bow right at the front.

Here is the end product, I left the front part empty for the candles.


Victoria Sandwich
source: my mum's recipe book

4 oz self raising flour (I used Blue Key)
1 tsp baking powder
3 oz castor sugar
2 medium size eggs
4 oz butter
* I doubled the recipe for this birthday cake.

Method:
Cream butter and sugar until fluffy.
Add in eggs one at a time, beat well.
Fold in flour in batches and mix well until batter is smooth.
**
Line and grease 2 baking tins.
Bake for about 25-30 min at 180 C.

Take cakes out of tins and cool on racks.
When cakes are still warm, spread jam on the surface of one cake (pick the bottom part of the cake, as it is easier to spread the jam) before topping it with the other cake.

** If you are doing the chocolate part, put aside half of the batter and add 1 Tbsp of cocoa. Mix well until all the batter is evenly mix, just use a wooden spoon or spatula. Pour batter into tin and bake.

For the butter cream
125g butter
70g shortening
80g icing sugar (please sift first)
1 tsp vanilla
1 Tbsp condensed milk

In a bowl beat butter and shortening until light and fluffy,
then add the vanilla. Beat again.
Gradually add the icing sugar and continue beating until all the
sugar is finished. Lastly add in the condensed milk.
Mix well and it is ready to be used.

For colour, just add a few drops of your favorite colour. 

Happy Baking!


Monday 22 September 2014

Marble Cake - another recipe


Just look at that, sedapkan?
YES! It is!
Forgive my rudeness, but you ought to give this recipe a try.
It is just perfect for lazy me. The steps and ingredients are basically easy.
Okay let's back track for a bit.
As always, me and almost everyone out there love browsing through the internet, other then their
prefixed favorite pages.
I'm no different, but I do love roaming and reading cooking blogs especially ones with recipes and good pictures. Ahem, the pictures do help!
Sometimes, it is irritating when I scroll down only to discover only pictures and no recipe *sigh* but I guess some people don't want to share or just love posting pics.

I came across this wonderful site. Not sure how I missed it before but it has some very interesting recipes.
I like the layout, very user friendly and the instructions are easy to follow. To find out more, click here -
 QL Kitchen

I'm sharing their Marble Cake recipe. Try it, it is worth the time and effort.
I used a wooden spoon to beat up the butter and sugar, too lazy to take out the hand mixer.
I also added 1 tsp of Baking Powder to the flour.
I used 1 non stick loaf pan. 30cm x 11 cm, 6cm deep. I still greased and lined it with paper anyway.

The cake is light, not too sweet or greasy. The masses ate almost half! I was lucky to snap the photos before it disappeared!
Well QL Kitchen, thank you so much! I'm sharing this wonderful recipe with everyone else. This recipe is definitely a keeper!!


Marble Cake
source: QL Kitchen

Ingredients

225g butter
225g castor sugar
225g all purpose flour (to this I added 1 tsp baking powder)
4 eggs
6 Tbsp milk (I used evaporated milk)
2 heaped Tbsp cocoa (I only used 1 1/2 Tbsp)
1 tsp vanilla

Method
Cream butter and sugar. Add eggs one at a time.
Add in vanilla essence. Mix well.
Alternate the flour and 3 Tbsp milk, mix well.
Divide the batter into 2 bowls.
Leave one plain and to the other half add cocoa powder and 3 Tbsp milk.
Combine well.
Use 2 clean spoons to alternate the batter into the cake tin.
Lastly use a skewer to make marble like patterns on the top.

Bake at 180C for 45 mins - 1 hour. It depends on how many cake tins you use.
I used 1, but QL used 2 smaller ones, so the cooking times is faster.
Allow to cool before tipping it out of the cake tin and on to a cooling rack.


Happy Baking.

Wednesday 17 September 2014

Scones


Scones


Scones... Mmm I love the buttery smell of scones. It is delicious even on its own. Opps I sound like a roti add on tv! Straight from the oven, warm or cold I love them.
But seriously scones, a tad tedious to do as it requires the least bit of handling or you'll end up with a lump of rock instead of scrumptious scones.

I used a fluted biscuit cutter, sometimes I just use one of the biskut raya cutter in the shape of a circle.
Some scones aren't round but triangle or look like slices of cake. Instead of using a cutter, the round dough is divided into 6 or 8 depending on your preference.
You decide which shape or size you want your scones to be, after all you as the baker has the last say!
As to glazing the tops with eggs makes it look more brown and golden compared to just milk. I brushed mine with milk. Some recipes say you can add dried fruits some don't. I just added a handful about 50g or so into the flour. If you like yours plain, omit the fruits.

I tried two recipes, one with egg and the other without. After tasting both I decided they both tasted almost the same. So here are the recipes if you want to give it a try.


Scones
source: BBC Food recipes

225g/8 oz self raising flour
55g/2 oz butter
25g/1 oz castor sugar (about 1 Tbsp)
150 ml milk
(to glaze: 1 egg - optional. Brushing the tops with milk is fine)
(50g dried fruit - I added raisins, it is optional)


Method
In a bowl rub the butter into the flour until mixture resembles bread crumbs.
Stir in the sugar and the dried fruit if using.
Then add the milk until you get a soft sticky dough.
*I added a bit more milk to mine as it was dry.
Turn on to a floured work surface and knead lightly.
Gently pat out a round about 3cm thick.
Using a biscuit cutter, cut out the scones. Just press down
onto the dough and push out with your fingers lightly.
Arrange scones onto a greased oven tray.
Brush top with egg or milk.
Bake for 15 - 20 min at 180 - 200 C, depending on your oven.
Cool on a wire rack. Serve with your favorite jam or whipped cream.


Mary's Tea Time Scones
source: BBC Food Recipes & Mary Berry

250g/9 oz self raising flour
1 tsp baking powder
40g/1 1/2 oz butter
25g/1 oz castor sugar
1 egg
about 100 ml milk

Method
Put the flour and baking powder into a bowl.
Add in the butter and rub it in the flour until the mixture resembles bread crumbs.
Stir in sugar.
Beat the egg in a measuring jug and pour enough milk until 100ml.
*For this I also added a few tablespoonful more of milk as my dough was dry
Set aside 1 Tbsp for glazing the scones later.
Turn the  mixture out onto a floured surface and pat a round about 2 cm thick,
Use a biscuit cutter to cut out the scones.

Place the scones on a greased oven tray and brush the tops with the leftover milk/egg mixture.
Bake the scones for 10 min at 190-200 C.

Cool on a wire rack and serve with jam or whipped cream.


Happy Baking.


Sunday 7 September 2014

Victoria Sandwich Cake

Baked this lovely all time favorite of the family and masses, Victoria Sandwich Cake.
I barely popped it out of the tins, it was still warm and Mum wanted to know if she could have a piece!
Not yet, said I as it has to cool slightly before I spread the jam and topped the other half over it!
As requested, I made the second half of chocolate.
Simply really, just add 1 Tbsp of cocoa powder with just enough water to form a paste.
Then add that to half of the batter.
Stir well to ensure all the 'white' turns chocolate.

If you want to try this lovely recipe for tea or just to eat cake, go here


Happy Baking!

Monday 25 August 2014

Kuih Lompang


Some people get this kuih mixed up with another kuih called Kosui.
Some say it is the same thing only Kosui uses palm sugar where as Lompang uses white sugar.

To me both kuihs are different and delicious in their way.
Here is the Lompang recipe that my family have used for years.
It is from a recipe book by Puan Zarina Ibrahim - Zarina's Easy Cooking.
This book has been used for so many other recipe, that should the author look
at the condition of it I wonder if she would be saddened at it's state or proud that
we used her recipes over and over again!!

Here is the recipe, terima kasih banyak-banyak Puan Zarina.

Kuih Lompang
source: Zarina's Easy Cooking.

225g sugar
250ml water (for boiling sugar)
1 or 2 screwpine leaf
300g rice dough ** I'll explain in a bit
2 1/2 Tbsp of tapioca flour (tepung kanji)
250ml water
1/4 tsp salt
Food colouring, depends on how many you want.

Method
Rice Dough
First we'll do the rice dough.
Measure out about 1 cup of rice flour in a bowl.
What I do is mix water bit by bit to rice flour until it becomes a moist dough.
Not to wet, so be careful. If it is crumbly then you got a dry dough.
Then using a weighting machine, weight the dough.
If you still haven't got 300g repeat process but lessened the flour.

Put your steamer on the fire, make sure there is enough water.
In a pot put water, sugar and screwpine leaf and boil until sugar dissolves.
Put aside to cool.

In another bowl, put rice dough, tapioca flour, salt and water (the second one)
using a spoon or hand, mix until all combine.
Pour the now cooled syrup into the rice mixture, stir well and strain for
any lumps.

Depending on the colours you are using, divide the liquid into portions.
Example, three colours, three different bowls or jugs.
Add a few drop of food colouring to each container.
Now pour the liquid into preheated chinese tea cups.
(Steam the cups in the steamer for not more than 20 min)

Steam the mixture for about 20 - 25 min, make sure the water is boiling.
Allow to cool before loosening it at the sides with a knife.
Serve with grated coconut or just on its own.


Wednesday 13 August 2014

Red Velvet Cake

Haven't been updating this blog for a while now.
Most common and popular excuse would be busy! Busylah LOL doing other stuff.
Recently I haven't baked anything, in fact I have been doing a lot of reading.
Sad to say nothing very intellectual but just fiction (like the Beast song) detective stories.
I love them and I think for the past weeks I have bought more books than I ever did in the past year!

Entahlah, there were loads of interesting titles simply calling out to me, you could say I could set up a mini library....
I did give up some books a month back, for a good cause tau! I mean I have reread it several times over and time to share with others. But after my numerous trips to the book shop my book shelf dah penuh balik!!

Today I did bake, had an order for 2 red velvet cakes.
Not only has it been a while since I baked but it has also been a long while since I baked red velvet, cupcakes or cake.
But thankfully I managed to finish both.
This moist and yummy recipe is from Puan Azlita. She has several version of this decadent cake but I chose the easiest one! Have a try, it is worth it.
For today's cake I didn't do her cream cheese topping, instead I opted to iced mine with butter cream instead.
Kak Ita used, two 8' tins, but I used 3.


Red Velvet Cake
source: Puan Azlita Aziz Masam Manis

360g all purpose flour
1 tsp baking soda
1 tsp bicarbonate soda
1 tsp salt
2 Tbsp cocoa powder
400g castor sugar
1 cup oil (I used sunflower oil)
2 eggs
1 cup buttermilk (1 Tbsp vinegar + 1 cup milk, allow to sit for about 5 min before using)
2 tsp vanilla
1 tsp vinegar
1 Tbsp red food coloring (this depends on the type you are using)
1/2 cup hot water (optional - you can add 1 tsp coffee to this)

Method
Sieve the flour, sodas and cocoa powder - put aside.
In a bowl mix the oil and sugar.
Then add eggs, buttermilk, vanilla and colouring. Use a spatula or whisk to mix well.
Add the hot coffee and 1 tsp vinegar.
Gradually add the dry ingredients to the liquid.
Pour the batter into prepared tins.
Bake at 180 for 20 min. This depends on your ovens.


Butter cream
125g butter
70g shortening
80g icing sugar
1/2 tsp vanilla or lemon paste

Method
Cream both butter and shortening first until fluffy.
Add the vanilla and half of the sugar. Beat again.
Add the remaining sugar when icing is creamy.
Beat again.
* If the icing is too stiff to spread add 1 or 2 tsp milk.
Spread onto cake and decorate as you like.

Happy Baking.


Sunday 27 July 2014

Moist Chocolate Cake

Out of the blue suddenly mum wanted a chocolate cake for Raya.
So I whipped this up in a jiffy, as you can see the result is not so good but the taste it!
That is important! LOL
This time I chose an rectangular cake tin instead of the usual round one.
As it is easier to cut to smaller pieces, lagi pun most people just want "A small piece"!!

Want to try the recipe? 
The recipe for this is here


For the icing I opted for a different one, as I didn't have any cream at home.

Icing

Ingredients
4 oz of icing sugar (sieved)
1 1/2 oz  butter (at room temperature)
1 1/2 oz cocoa (sieved)
enough milk

Method
In a bowl combine all ingredients except for milk.
Mix well to form a paste, then slowly add the milk until the icing is smooth and spreadable.
Once the cake is cooled, cover the cake with the icing and decorate as you like.

Happy Baking.

Thursday 24 July 2014

Apam Karamel or Apam Gula Hangus

I actually made this yesterday but didn't have time to get it down. It was on the spur of the moment kind of thing.
It was quite late and Mum wanted to eat apam. She loves all sort of apam and enjoys trying out various recipes of it. At one time, she made so many that we all had a hard time eating all the apam.
So back to the recipe, this time Mum wanted a gula hangus apam.
I checked the usually blogs and found an straight foward one by Mat Gebu.

The recipe is easy to follow and tastes very good too. Trylah, you might not like apam but let me tell you this apam is not like the usual beras ones, in fact it is almost like a sponge cake. Best eaten on the day it is made and better still with freshly grated coconut with a pinch of salt!!

Like all steam cakes, get your steamer and cups ready. It is best even when not mentioned in recipes to steam the cups a while before pouring in the batter. Don't know why, but Mum says so, I just follow.
I used medium sized porcelain cups that were greased lightly. You may also line the cups or what ever mould you are using with paper cups.


Apam Karamel or Apam Gula Hangus
source: Dapur Tanpa Sempadan

A
1 cup sugar
3/4 cup water

B
2 eggs
1/2 cup of oil (I used cooking oil)
2 Tbsp  condensed milk
2 Tbsp butter or margarine
1 tsp bicarbonate of soda
1 1/2 cup of all purpose flour (he added another 1 Tbsp, so did I)
1 tsp vanilla (I added this)

Method
First in a pot, caramelized the sugar over low heat. When the sugar starts to burn and turn amber slowly swirl the contents of the pot. Be careful not to burn the sugar. When almost all the sugar is brown, carefully pour the water. Allow the sugar to all melt before switching off the fire and leave the caramel to cool.

Next in a bowl beat eggs, milk, oil and margarine using a whisk. You may use a blender or hand mixer.
Then slowly pour in the cooled caramel, soda bicarbonate and beat again. Add in the vanilla.
Lastly add the flour in batches while whisking until it is smooth.

Pour the batter into the warm cups and steam for about 10 to 15 mins.
**make sure the water of the steamer is bubbling.
It is cooked when the apam is springing to the touch.

Happy Baking.


more biscuits for Hari Raya

Just when I thought I could keep all my baking stuff, Mum tells me all the cookies are dark.
She wanted a variety, so I dragged out all my stuff and feet to start baking again.

Today I made Biscuit Dahlia.


Feeling rather rajin I decided to measure out the recipe for sugar cookies.
They are basically plain butter cookies and it is up to you to decorate it.
I got the recipe from BBC and it was a Christmas deco but edible cookie.

This year I egg washed it and sprinkled some purple coloured sugar and pink, red and white hearts and named them The Love Bears! I think they are so adorable and cute plus yummy as well!


The recipe for Biscuit Dahlia can be found here.
The recipe for the Bears of Love can be found here.

Happy Baking.

Monday 21 July 2014

Pineapple Tarts

No way I am getting away with NOT baking pineapple tarts!
It happens to be my mum's all time favourite.
But at least now I don't have to make the jam anymore, it is easily available at all supermarkets and
baking goods shops. One less chore for me!

Through out the years, my mum and I experimented with a lot of recipes for pineapple tarts.
Once upon a time ago, we even made our own jam. Yep buy by the lorry load from the market.
Peel, slice and then grate it all before the slow process of cooking the jam. Let me tell you, if my poor fingers could talk, they'd probably tell you how many times they got burnt and oh... the jam too, occasionally!

We did the pineapple tarts, the ones where you just use a cookie cutter and press the jam on top, another version was clipping the edges finely! Hated that one!
There was the one shaped like a pineapple, hmm... if my poor thumbs could speak! I endured painful fingers holding that tiny scissors clipping away the pattern of the fruit! Then came the pain staking process of shoving a clove as stem of the fruit!  Horrible! I hated that one even more.

I must have made close to a million of these tarts, for sale and our own consumption. Frankly it is not my favourite kuih raya.

Then one fine day, we discovered the nastar or pineapple roll. I love this, easy and fast. The hard part is rolling the jam into small balls and of course refilling the mould! I have several moulds but strangely I just like one, it is my favourite one and works wonderfully! But after a few hundred, favourite or not, my poor thumbs ache!

Here are some of the types of moulds that can be used for this recipe, just use the one that you are comfortable with.


The recipe I have is by Amy Beh from her book At home with Amy Beh (vol 1)
I didn't follow the recipe for the jam as I bought mine. Roll the jam into small balls, believe me it makes life with the pineapple tarts a whole lot easier!!


pic courtesy of Google.


Pineapple Tarts
source: Amy Beh

Ingredients
Pastry
150g buter
100g margarine
75g icing sugar
2 egg yolks
1 tsp vanilla
1/4 tsp salt (I didn't add this)

350g all purpose flour
100g corn flour

For the glaze: (I didn't follow this, I egg washed mine with just a whole egg and a bit of water)
1 egg yolk
1 tsp condensed milk
1/4 tsp salt
1/4 tsp water


Method
In a bowl, combine both butter and margarine with the icing sugar.
Beat in the yolks. Add in vanilla.
Gradually add in both flours until it becomes a firm dough.

Put enough dough into the mould and using both thumbs, gently press it out.
Leave about a few inches long, enough to put the balls of jam and to roll later.
After rolling the dough with the jam, cut off the excess and place on a well greased
baking tray.
Brush lightly with the egg wash and bake for 15-20 min at 175C or until golden brown.

Once cooked allow to cool before removing from baking tray.
Sometimes, the egg wash makes the cookie stick to the tray, using a butter knife gently pry it from the
tray. Be careful, the tart is fragile at this point and breaks easily.


The balls of pineapple jam

Pipe out the stripes of dough and place the ball of jam and roll.

Place them on the baking tray and brush the egg wash.

Bake until golden brown - yummy!


Happy Baking.

Sunday 20 July 2014

Samperit

Yes, yes Hari Raya is almost here. Kuih raya is a must in most household if not all. It doesn't matter whether it is bought or homemade, you definitely will find several decorative balangs of kuih during Open Houses.
We do celebrate Raya but rather low key, if compared to the norm.
To me it holds too many memories that aren't that memorable but that's me.
It is the festive season after a month of fasting, so feasting is inevitable although better avoidable ... LOL

There's an additional cookie to my list of kuih raya this year. Samperit! I haven't baked any in ages.
But my sister nak makan, so I searched the blogs for a yummy and good looking one.
After going through several, I came across one LiNa Pg's blog recipe for the samperit/dahlia kuih raya looked good. Terima kasih banyak-banyak, kak!


In her recipe, she used another acuan and made kuih dahlia. I used another and left out the cherries.
I used the acuan for muruku, the one that looks like a T. I pressed out long stripes before cutting it shorter.
See pics, the muruku acuan I meant is the brown coloured one. You could also use the white smaller one, but it would take longer to finish.


The biscuit is crunchy yet delicious. Very addictive, you'll find yourself eating several at one sitting!
Beware, if too thin the biscuit is very fragile.
Sprinkle some edible coloured sugar on top just before baking for some variety or colour, leaving it as it is fine too.

The recipe is as follows.

Samperit/Dahlia
source: Teratak Mutiara Kasih, Puan LiNa_Pg

300g butter
160g icing sugar (sieved)
2 egg yolks
1 tsp vanilla
240g all purpose flour
100g corn flour
160g custard powder

Method
Sieve all three flours and put aside.
In a bowl, I used a wooden spoon and combine the sugar and butter.
Do not over mix, as the dough will spread when baked and the patterns cannot be seen.
Mix just until the sugar dissolves.
Add the yolks and vanilla. Mix again.
Lastly add in the flour in 2 batches.
Mix until the dough becomes firm.
Form into balls and put into desired acuan.
Bake at 140C for 20 min or less. It depends on your ovens.
The yellow dough would turn slightly brown when cooked.

Happy Baking.


Thursday 17 July 2014

Agar-agar Marble - Chocolate and Milk


The preparations and ingredients for the all time favorite dessert is rather easy.
All you need is the patience for the jelly to hardened before you can eat it!
I am sure every family has their own favourite and secret version of this recipe. But I got the recipe from Kongsi Resepi, but I can't remember who the blogger was. But anyway thank you very much!


You might have noticed that the 'jelly moulds' are actually cupcakes pan! Yep, just got them and I wanted to try them out so much, I poured the jelly into them. Very happy to report they were truly worth every sen!
Small bowls or cups or the usually jelly moulds also can. It is entirely up to you.

Right, back to the recipe. The actually recipe calls for the agar-agar mixture to be divided into two, one for chocolate and the other for milk. But I didn't do this instead for the milk I took out about a cup while the rest of the agar-agar I mixed it with cocoa powder. It is really up to you how you want your jelly to look like, more chocolate, or milk or equal parts. Or you could just make it an all chocolatey agar-agar!


Chocolate Agar-agar
source: Kongsi Resepi.com


A
1 packet agar-agar (It is strips of dried transparent strips of agar-agar, in a long clear packet)
1 cup sugar

B
1 medium egg
1 tin of evaporated milk
2 Tbsp custard powder
750 ml water
1 tsp vanilla

C
4 Tbsp cocoa powder or Milo


Method
Put A into a pot and bring to a boil. Turn the heat to low.
Next in a bowl, beat the egg and milk. Separately, combine the custard powder and 2 Tbsp of water first
before adding the rest of the water. This is to prevents lumps. Add the custard mixture and vanilla into the bowl of egg and milk.

Pour the milky mixture into the pot of agar-agar and mix well. Stir to combine all. Turn up the heat again and boil. Don't boil too long or it will be lumpy.

Next divide the agar-agar to the portions you want. Leave one plain and the other add the cocoa powder or Milo.

Pour one portion into moulds leaving it to slightly hardened, about a few minutes. Keep checking, if the jelly is slightly shaky is the best time to marble it or if you prefer to have 2 layers instead, wait a bit more before pouring the other portion.


Happy Baking.

Sunday 13 July 2014

Bingka Cheese

Bingka Cheese, mmm.... aparently I, once again and not surprisingly missed this band wagon.
I just only found out about this delicious and rich delicacy.
To me bingka was often ubi kayu or tepung with the variety of it being made with either white sugar or palm.

My mum yang wanted to taste it, so I went 'digging' around various blogs and sites searching for the most promising one.
Me being me, lazy, opted for the easy, simple not too many steps recipe. But there were sooo many!
I had a tough time deciding and pondering which one, which one. The bingka is rather costly and I can't afford to make experiments or mistakes. Some gave precise instructions and measurements and then there were some who didn't! Some merely posted pics!
Kepala pun sudah sakit, the mouth watering pics were no help either!
But eventually I did found an interesting one, relatively easy too. Terima kasih banyak-banyak Puan Izah of Izah Muffin Lover
But nothing is easy, and I re-read the recipe several times and followed the instructions carefully. Thanks to God I made it and the masses had a cheesy feast!

Puan Izah got the recipe from HaSue, another blogger with fantastic recipes but she made some changes to the original HaSue's. Check out both their recipes and see the difference. In Puan HaSue's recipe, she used HongKong Flour and agar-agar, where else Puan Izah used Tepung Gandum and powdered agar-agar.

As HongKong flour is difficult to find and expensive, I opted for tepung gandum and agar-agar powder instead. But the result is satisfying, I can't say which is better as I have never tasted or seen the HongKong  flour version of this bingka. But I'm happy with mine.


The recipe should you want to give it a try is as follows.

Bingka Cheese 
source: Izah Muffin Lover

A
10g of agar-agar powder or 1 packet of  Swallow brand agar-agar powder
3 cups of water
1 cup of sugar (I lessened it a bit)

B
250g of butter (1 block, I used Farm Cow) (at room temperature)
250g cream cheese (1 block,  I used Fatura)
1/2 tin of condensed milk
3 eggs
1 tsp vanilla or 1 tsp lemon juice
1 1/2 cup of all purpose flour (I used Tepung Gandum Blue Key)

Method
In a pot combine A and boil until the sugar dissolves. Put aside.

Using a hand mixer, beat eggs until light and fluffy.
Add in the butter and milk. Beat again to combine.
Add in flour, cream cheese (cut into small pieces, easier to mix) and vanilla.
Beat well until the batter is smooth.

Next, pour the warm agar-agar liquid into the batter and beat again, at high speed.
Sieve the batter into a grease cake pan. (I forgot to do this, but the bingka turned out ok)
Bake at 175 C for 1 hour.

Happy Baking.


Wednesday 9 July 2014

Eggless Caramel Pudding

Pretty hot these days, leaving us feeling parched and amazingly what comes to mind or to be exact what your tummy needs is something really cold and sweet. The answer is ... ice cream!!
But after that nice coldness comes the warmth again, it doesn't last long and another helping is well a little too much eh?
After all how much ice cream can one eat? It depends on who you're asking, an ice cream lover who definitely say endless tubs, where else some might say depends on the flavor!
Me personally, a few years back I enjoyed Swensen's Earthquake despite shivering, teeth chattering and all as I bravely finished every last scoop, but now I would say about 2 scoops is the most I can eat. But then again it depends... on many other things! LOL
Enough ramblings and back to the puds. Puddings, hmm... most of us have each a fair share in our life time.
Bread puddings, steamed puddings, sticky toffee puddings dan lain lain. All my life I have eaten caramel puddings that had eggs.
I am not a fan of eggs, unless of course it is well mixed in the food. I know this sounds snobbish but I only eat the caramel puddings made at home, that has lots of vanilla and not too sweet.
So when I came across aku bukan master chef's Eggless Caramel Pudding in his blog I was naturally intrigued and immediately wanted to try it out.
But alas, time was not on my side nor the ingredients so  I had to wait and shopped for the stuff first.


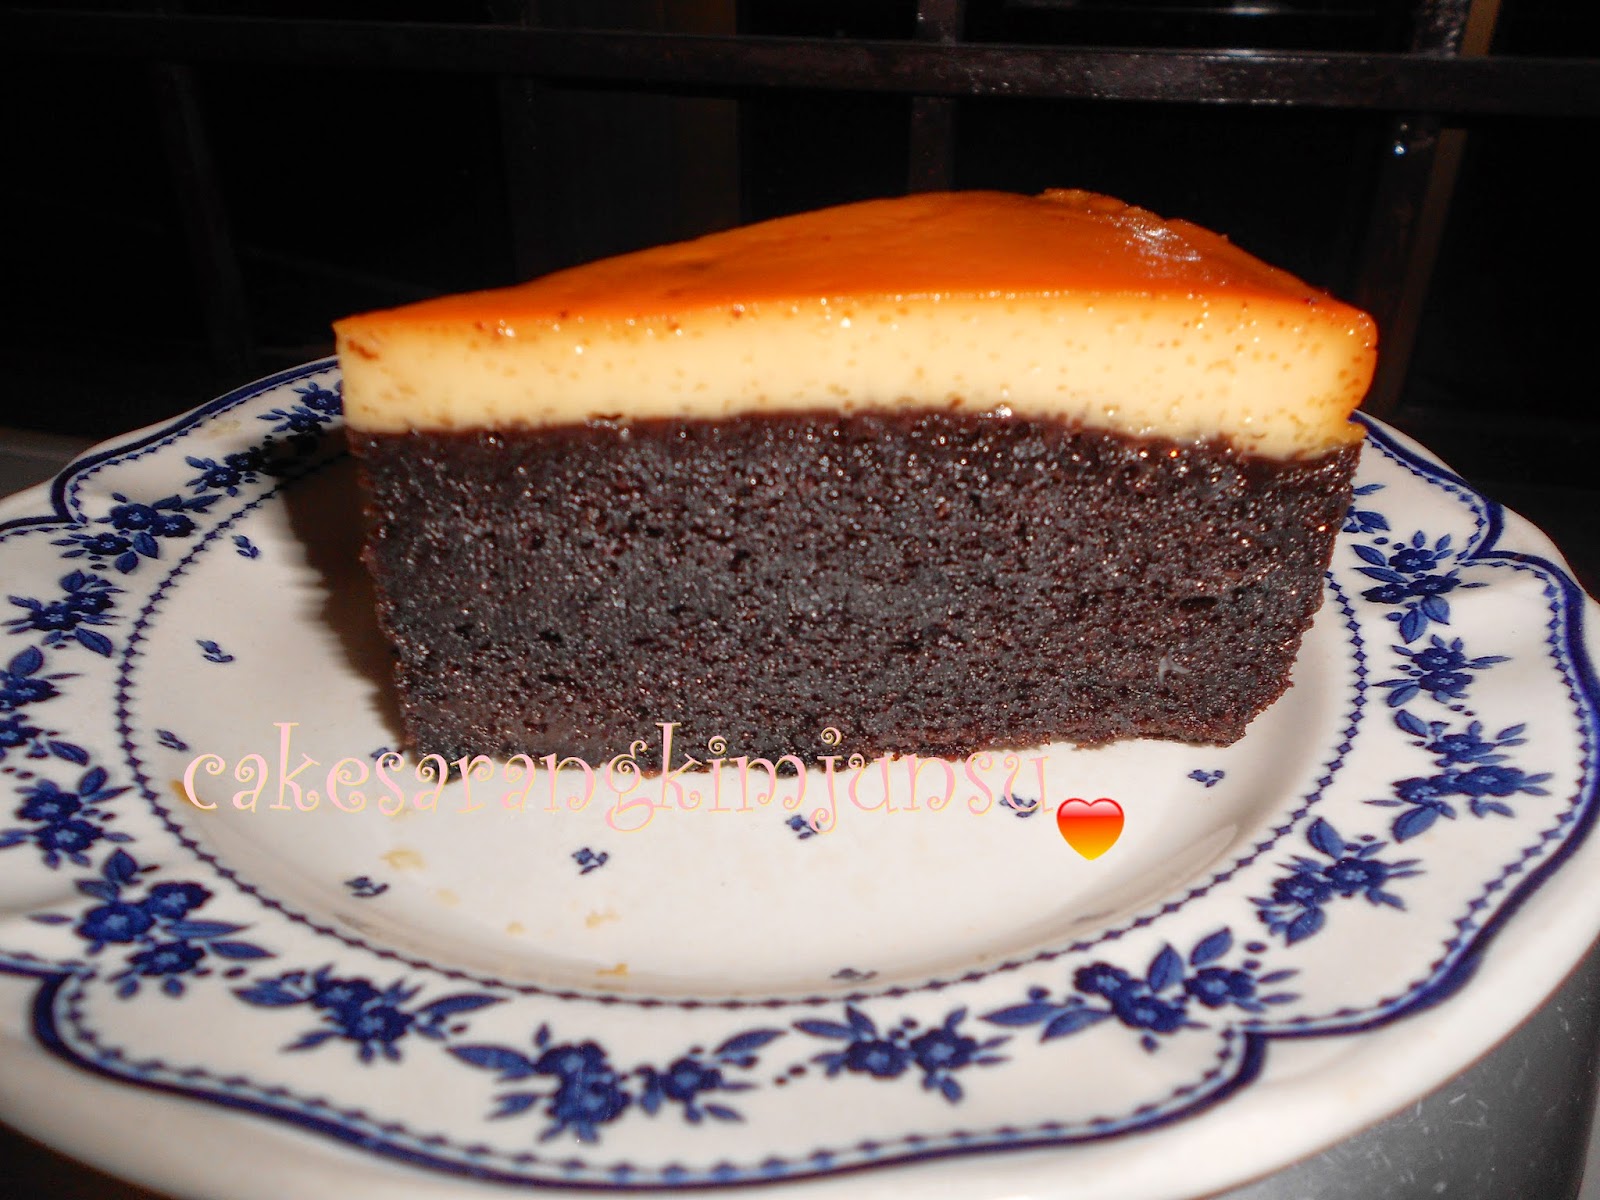
Just look how smooth the texture of the pudding is, mmm... delicious! But wait before I go into the recipe let me say that this wasn't my first attempt.

I'm human too, and to err is human.
My first attempt at the eggless caramel pudding was a awful, it was a disaster. I admit in my haste I didn't read the recipe carefully and as a result a simply pudding turned out wrong. It didn't hardened and was way too sweet (the result of misreading measurements!!), so sadly it ended up in the bin.

I waited for a few days to calm down before tackling this pudding once more. I told myself that if I failed again this time, I'd move on to another recipe or find a better one.
I have tried several of abm's recipes before and they turned out well, so all mistakes are mine and mine alone.

This time around, I read and measured everything very carefully, took my time to do it and thanks to God I made it! Yay!
It was very well received by the masses, even mum said it was delicious! Now pleasing my mum, who is a perfectionist and a very picky and fussy eater is very difficult. So, we have a saying -  if mummy kata sedap, sedaplah tu! 


Don't go through the hassle of weighting the agar-agar powder. In the shops I found out that there are 2 brands selling agar-agar powder, one is Nona and the other is Swallow.
They are both yellow packets.
I got this on Google, the label isn't so clear but it looks like this.


Don't use the Konnyaku Jelly, that is completely different.
Read the labels carefully, Nona is only 8g but Swallow is 10g. So as the recipe requires one packet of Swallow is enough.
Another thing, make sure you pick the one that says CLEAR, don't pick the colored ones or you'll get a colorful pudding.
Don't add the custard powder all at one go. Mix the custard powder with one cup of the four cups of water before adding it to the pot to avoid lumps.

This pudding also doesn't require any baking! Just a little cooking over the flame, pour into moulds or tins and chill in the fridge.

Here is the recipe and I hope you'll enjoy it as much as we all did!


Eggless Caramel Pudding
source: Aku Bukan Masterchef

A
4 Tbsp sugar

B
10g agar-agar powder
1/2 cup sugar
4 cups water
1/2 cup condensed milk
1 tin evaporated milk (about 390g)
but abm used 400 ml fresh milk. I used 400 ml low fat milk.
3 Tbsp custard powder
1 tsp vanilla


Method
First pour A into the cake pan you intend to make the pudding in.
I used a round 22 cm cake tin. Over a low flame slowly caramelized the sugar.
This requires patience, be careful not to burn the sugar or you'll end up with a bitter pudding.
As tempting as it is, don't stir the sugar. Some parts might burn faster, so just slowly tip the tin
a little to help the process along.
Once all the sugar has turned a deep amber color and melted, it is caramelized.
Switched off the fire and remove the tin. Put it aside and let it cool, the caramel will hardened but don't worry.
Next in a pot, you'll need a medium size pot and put in all the ingredients.
Cook over medium heat and whisk slowly. This pudding burns easily so don't leave the pot.
Keep stirring until the mixture thickens up.
It'll take a few minutes, the mixture will start to thicken. Keep stirring to avoid lumps and when it starts to bubble switch off the fire and immediately pour into the tin with the caramelized sugar.
abm recommended using a strainer but I forgot and just poured the whole thing in.
Leave the pudding to cool slightly before chilling it in the fridge for about 3 hours.
After 3 hours, to serve ...
Use a plate larger than the tin and place it over the tin. Slowly turn the tin upside down and allow the pudding to slip out. Be careful of the syrup that flows out with it. This pudding cuts beautifully too.


Happy Baking umm.. eating!


Sunday 29 June 2014

Cheese Cake

Non Bake Cheese Cake

I stopped experimenting on cheese cakes because number 1, the ingredients are expensive.
2. It is a bit rich and takes a while to finish, yep, even by the masses!!

But the other day I was just jalan-jalan at a supermarket near our house and lo behold! Fatura Cream Cheese 500g was on sale!! Ha! Ha! It even had free duit raya packets, don't need empty ones.
So back to my story, it took me about a few minutes to weight the pros and cons not to mention some very, very simple math in my head before I grabbed it and chucked it in the shopping trolley.

Not too sure what I intended to do with so much cream cheese, maybe eat with some crackers as I watched the 2014 FIFA World Cup? Beats nodding off at crucial moments during the match.

Once home, cream cheese safely stored in the fridge and I too forgot about it.
But yesterday I was just going through various cake recipes, wondering which one to try out when I stumbled across this rather quirky one.

The instructions were easy although a little too simple. Had some guess work on my part but thankfully the cake came out very well.
Trylah this recipe if  you love creamy non bake cheese cake as a dessert or just love cheese cake.

I did some changes to suit my taste but overall the cake is good. Simple but scrumptious.


Oreo Cheese Cake
source: fasyshane

1 packet of Oreo biscuits (whichever flavour doesn't matter as you have to remove the cream)
Digestive and Marie biscuits can be used too.
50g butter (melted)
200g non dairy whipping cream
250g cream cheese
2 tsp yogurt / fresh milk (I used fresh milk)
1 tsp vanilla essence
2 tsp gelatin & 1/4 cup water

Method
The Base
Remove the cream from the biscuits. Using a food processor or a rolling pin, smash the biscuits into crumbs.
Mix the butter and the biscuit crumbs until combined. Press down firmly the crumbs in a cake tin, make sure the crumbs are packed tightly and as smooth as possible. Use your hands, it is the best way although a little greasy. Chill in the fridge.

Filling
In a bowl beat the cream cheese, whipping cream and milk until thick and smooth.
I added 1 Tbsp of castor sugar (optional)
Add in the vanilla and stir in the gelatin. Mix well.
At this point, you can add some of the biscuit crumbs into the filling resulting bits of chocolate
biscuits in the white cake.
For the filling, I added 2 Tbsp of lemon juice and I omitted the crumbs bit.

Take out the base from the fridge and pour in the cream cheese filling.
Gently tap the sides of the tin to ensure no air bubbles.
Chill the cake for about 3 hours or better still overnight.
You can decorate the cake with fresh fruits, more Oreo biscuits, some blueberry/strawberry fillings (available at baking goods shops) or just leave it as it is.

Overall review, I am happy to say this recipe is good, one that I would definitely do again and again in future should the price of cream cheese turun again! Despite being non bake, it doesn't melt so easily like some recipes that I have tried out. Creamy and rich. Yum!


Happy Baking.